Cloud Firewall
Cloud Firewall
acting as port allowing on the instance. There are many predefined rules which user can use such as Ping, SSH, RDP, and Http-Https.
If these Cloud Firewall didn’t match what users need, they can custom their own Cloud Firewall or make changes to the firewall rules. Ingress and Egress rules can be added or removed to allow incoming and outgoing connections to the instance. If users accidentally ruin their predefined rules, they can remove all predefined rules and re-create all predefined rules with a single click. User can attach or detach multiple Cloud Firewall rules while instances are running. Disable Cloud Firewall is not recommended, but can be done for network testing purposes.
Benefits

Secure your instance
Cloud Firewall acting as port allowing for the instance. Attaching Cloud Firewall to the instance will allow network traffic to pass to or from the instance. Network packets that do not match the Ingress and Egress rules are dropped. Reducing the risk from the malicious requests without increasing unnecessary workload on the instances.
Benefits

Secure your instance
Cloud Firewall acting as port allowing for the instance. Attaching Cloud Firewall to the instance will allow network traffic to pass to or from the instance. Network packets that do not match the Ingress and Egress rules are dropped. Reducing the risk from the malicious requests without increasing unnecessary workload on the instances.
Completely controlled
Cloud Firewall is manageable self-service with user-friendly interface. You can attach or detach Cloud Firewall to any instance in your projects. Adding, modifying, or removing Cloud Firewall are allowed without any impact to Cloud Firewall on the other projects. You are also allowed to enable or disable Cloud Firewall on each instance for network testing purpose. If you accidentally ruin your predefined Cloud Firewall, you can delete all Cloud Firewall and re-create the predefined Cloud Firewall by using the single self-service button. No need to wait for the Cloud Provider interaction.

You can attach or detach Cloud Firewall to the instances without downtime. Adding and Removing Ingress and Egress rules are allowed without need to detach Cloud Firewall from the instance. A single Cloud Firewall is able to be attached to the multiple instances. An instance also have multiple Cloud Firewall attached to it.
Cloud Firewall is a free service. You can request NIPA to increase the quota limit for your Cloud Firewall without any charge.


Free of charge
Cloud Firewall is a free service. You can request NIPA to increase the quota limit for your Cloud Firewall without any charge.
How to use
Cloud Firewall is a feature like security group on AWS orFirewall rule on GCP. It is used for allowing or denying traffic to and from Instance (VM). NIPA provides thepredefined rules for user to attach to the Instance.

Predefined Cloud Firewall
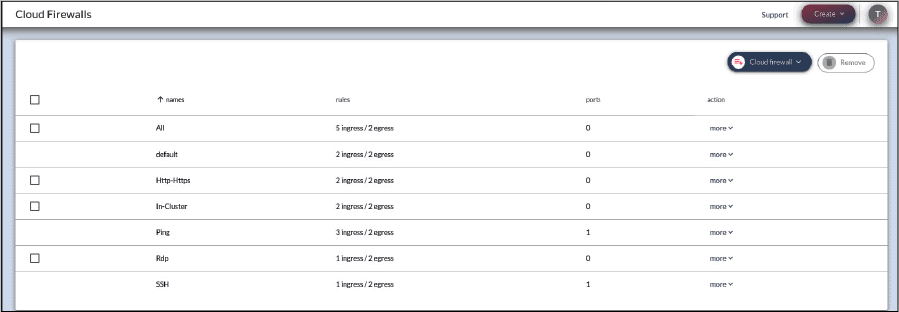
Predefined Cloud Firewall are created since the project in created. There are All, default, In-Cluster, Http-Https, Ping, Rdp, SSH Cloud Firewall. Each of them has the different purpose.

Create and Remove Cloud Firewall
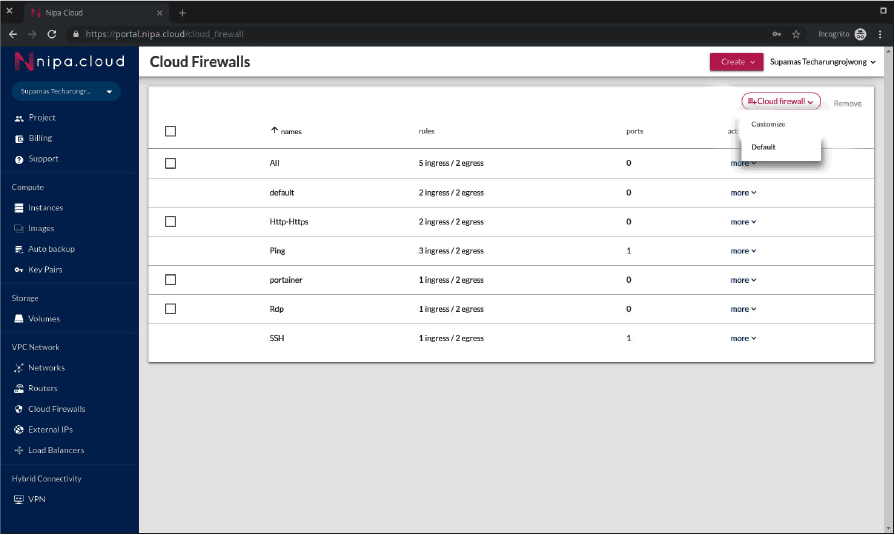
You can create a new Cloud Firewall by using the Customize button under the Cloud Firewalls menu. To prevent Cloud Firewall from exceed the quota, you should remove unnecessary Cloud Firewall from your project. Cloud Firewall is allowed to be removed only if there is no instance attached to it. You can remove Cloud Firewall by checking the checkbox at the front of Cloud Firewall and clicking the Remove button.

The newly created Cloud Firewall rule will have no ingress rule and Allow all traffic on Egress rule by default. You should manage the Ingress rules before attach Cloud Firewall to any instance.

Create and Remove Cloud Firewall
To allow port for instance which attach the Cloud Firewall, Ingress rule must be added. You can add new Ingress rule by clicking the Add rule button on the top-right of Ingress box. Use the Express Rules for well-known port or Custom Rule for your specific application port. After specify CIDR block as source address, click confirm to add the rule
To remove the rule from Cloud Firewall, click the remove button on the co-response line and confirm
Cloud Firewall need to be attached to the instance in order to allow network connection which match the rules to pass through. Cloud Firewall is stateful. If you send a request from your instance, the response traffic for the request is allowed to flow in regardless of the Ingress rule on your instance. Multiple Cloud Firewall are working together as aggregation operation. If you would like to deny all outbound traffic, you have to remove all Egress rule from all attached Cloud Firewall.
Attaching or Detaching Cloud Firewall
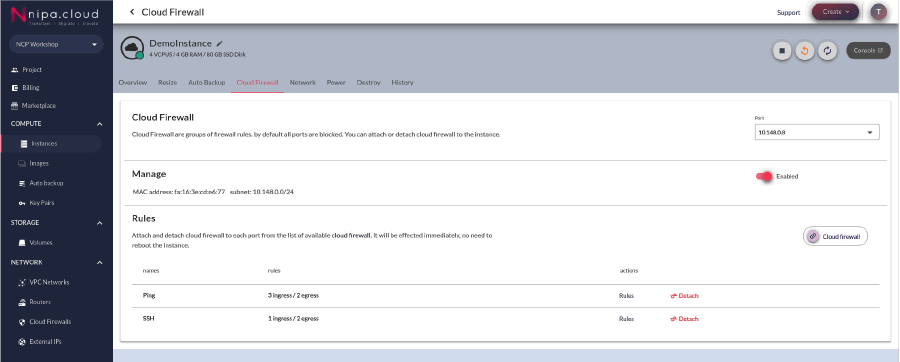
You can attaching or detaching Cloud Firewall with the Cloud Firewall tab on your instance.

Attaching or Detaching Cloud Firewall
You can attaching or detaching Cloud Firewall with the Cloud Firewall tab on your instance
Disabling or Enabling Cloud Firewall
You can disable Cloud Firewall on Cloud Firewall tab of the instance for network testing purpose. NIPA does not recommend to disable the Cloud Firewall on the production environment. There is an exception, if you understand the risk and would like to let network appliance instance handling all the network packet filtering. If the network testing is finish, you should enable the Cloud Firewall back. After you enable the Cloud Firewall back, all traffic will be block. You have to attach all neccessary Cloud Firewall back to the instance

Cloud Firewall named as All is allow icmp, all tcp, and all udp connection from anywhere. It usually being used for checking the network connection or being applied to the network appliance instance. This rule isn’t block any port. You should not attach this rule for non-network appliance instance on production environment.
Cloud Firewall named as default is allow any traffic from the instance which also attach this rule. Instances that attach only this rule are unable to receive any network packets from outside but able to receive network packets from the other instance which attach this rule. It being used as a default Cloud Firewall when an additional network port is created with Cloud Firewall enable. User should attach new Cloud Firewall on this port and remove this Cloud Firewall later.
Cloud Firewall named as In-Cluster is working in the same way as default. However, it’s actual purpose is to allow any network packets between instances in the same group to be able to work as a cluster. Cloud Firewall named as Http-Https is allow http and https port from anywhere. It should be used on the instance which provide web service. Cloud Firewall named as Ping is allow icmp from anywhere. It should be attached to every instance for checking network connectivity. Cloud Firewall named as Rdp is allow rdp protocol from anywhere which using on Windows remote desktop. It should be attached to the Windows instance.
You should not attach this rule on production instance before customize an Ingress rule. Cloud Firewall named as SSH is allow ssh port which using on Linux remote. It should be attached to the Linux instance. You should not attach this rule on production instance before customize an Ingress rule.
By default, all Egress rules allow any network packet to be sent out from the instance.
The predefined Cloud Firewall are simple rules for general user. It might not secure enough for your company. You can create additional Cloud Firewall and customize the rules to make it much more suitable for your application. If the rule number reach the limit on your project, user may send request to NIPA support team for increasing the quota limit without additional charge.
Cloud Firewall best practice
1. Do not use a large port range and large CIDR block as source. Using a large port range on your Cloud Firewall Ingress rule will increase the risk on your instance. If your application accidently binding to all network interfaces when it should listen on the loopback interface and the configuration is unsecure, your application might be exposed to the attacker. If you have an api service which being used by some fixed ip address servers, you should specify the server address as source instead. Cloud Firewall will drop attacker network packet and protect your service from DDoS.
2. Grouping and Simplify the Cloud Firewall. Sometimes, you have many servers which working in the same group or cluster and using the same group of Cloud Firewall. Using Cloud Firewall in service point-of-view might not suitable for your operation. You may have to attach many Cloud Firewall on many servers which may cause a human error. Grouping Cloud Firewall service in server group point-of-view may help you reduce the misconfiguration.
3. Use proper naming conventions for your Cloud Firewall Using proper naming convention will reduce the misconfiguration while attach the Cloud Firewall and maintain Cloud Firewall with your team.
By clicking on Accept, you consent to our privacy policy and agree to our use of cookies and other technologies to process your data, recognize your web browser and how you use the Service through the internet to give you better experience and analyze your visit. ตั้งค่า
คุณสามารถเลือกการตั้งค่าคุกกี้โดยเปิด/ปิด คุกกี้ในแต่ละประเภทได้ตามความต้องการ ยกเว้น คุกกี้ที่จำเป็น
Allow Allประเภทของคุกกี้มีความจำเป็นสำหรับการทำงานของเว็บไซต์ เพื่อให้คุณสามารถใช้ได้อย่างเป็นปกติ และเข้าชมเว็บไซต์ คุณไม่สามารถปิดการทำงานของคุกกี้นี้ในระบบเว็บไซต์ของเราได้