Virtual Private Cloud Network
VPC Network enhance security of network on cloud. It logically isolates multiple users subnetworks and prevents communication across the virtual networks of different user. VPC network also enables user to fully control their own virtual network. For example, create multiple subnets, configure the routing tables and network gateways, enable or disable DHCP, and override DNS ip address on their own network infrastructure. User can creating a complex network to improve layers of security for their cloud instances.
Virtual Private Cloud Network enhance security of network on cloud. It logically isolates multiple users subnetworks and prevents communication across the virtual networks of different user. VPC network also enables user to fully control their own virtual network. For example, create multiple subnets, configure the routing tables and network gateways, enable or disable DHCP, and override DNS ip address on their own network infrastructure. User can creating a complex network to improve layers of security for their cloud instances.
Benefits

Secure your instance
VPC Network lets you define virtual network on cloud. You CIDR network block can be the same number with the others without any problem or any communication leakage. You can create multiple subnet as a network zone. Separating private zone from the public zone and apply the proper Cloud Firewall will increase your network security.

Completely controlled
VPC Network enables you to fully manage cloud subnet with self-service interface. You can create subnet, define router for the newly create subnet, override DNS nameservers on the subnet if need. Enable and disable DHCP service for the subnet also allowed. Announcing the routing to all instance in the subnet is easily. No need to contact cloud provider.
How to use
You can create new subnet by using the create button on the VPC networks and click on the network dropdown menu button. Specify the proper network name and CIDR network block. By default, Cloud Firewall, DHCP, and Gateway on the subnet is enable. You can toggle the switch to disable them. If the Gateway to router is enable on the network, you have to pick the router to associate the newly create network to it.
You can remove the subnet from your project only when there is no instance using the subnet.
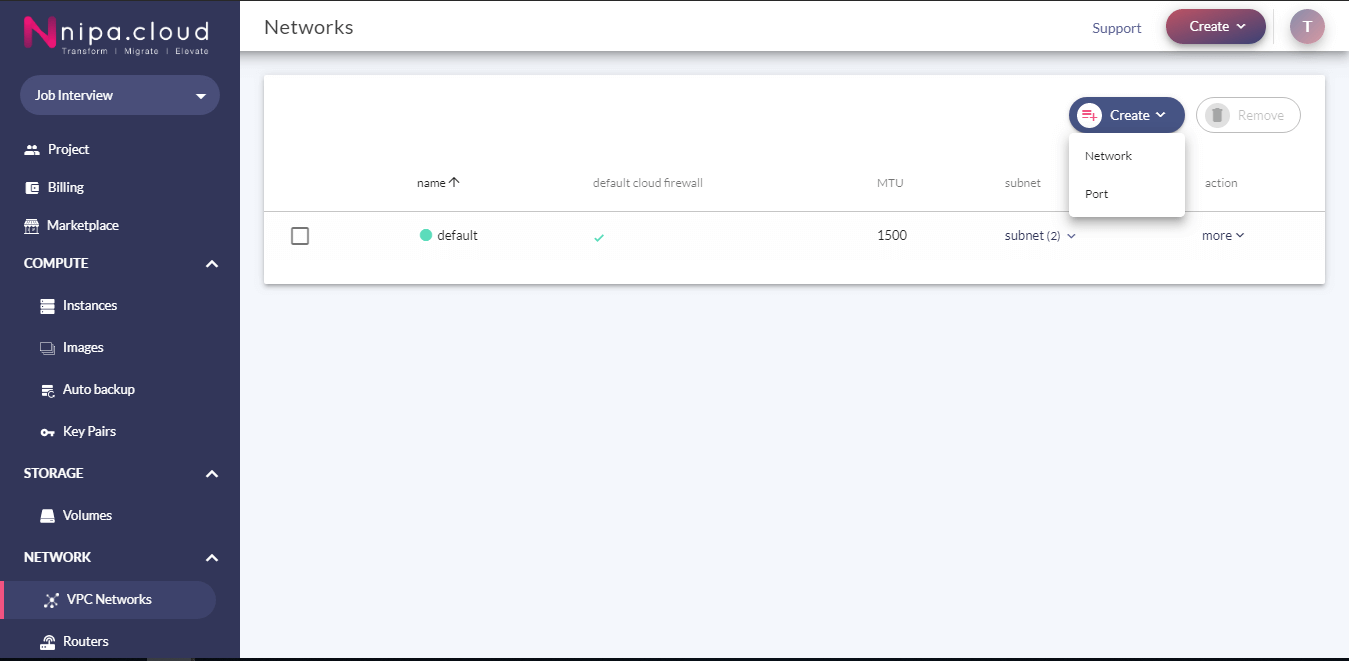
To change the Cloud Firewall name, just click on the more button, pick the rename dropdown menu button, and enter the new name before confirm.
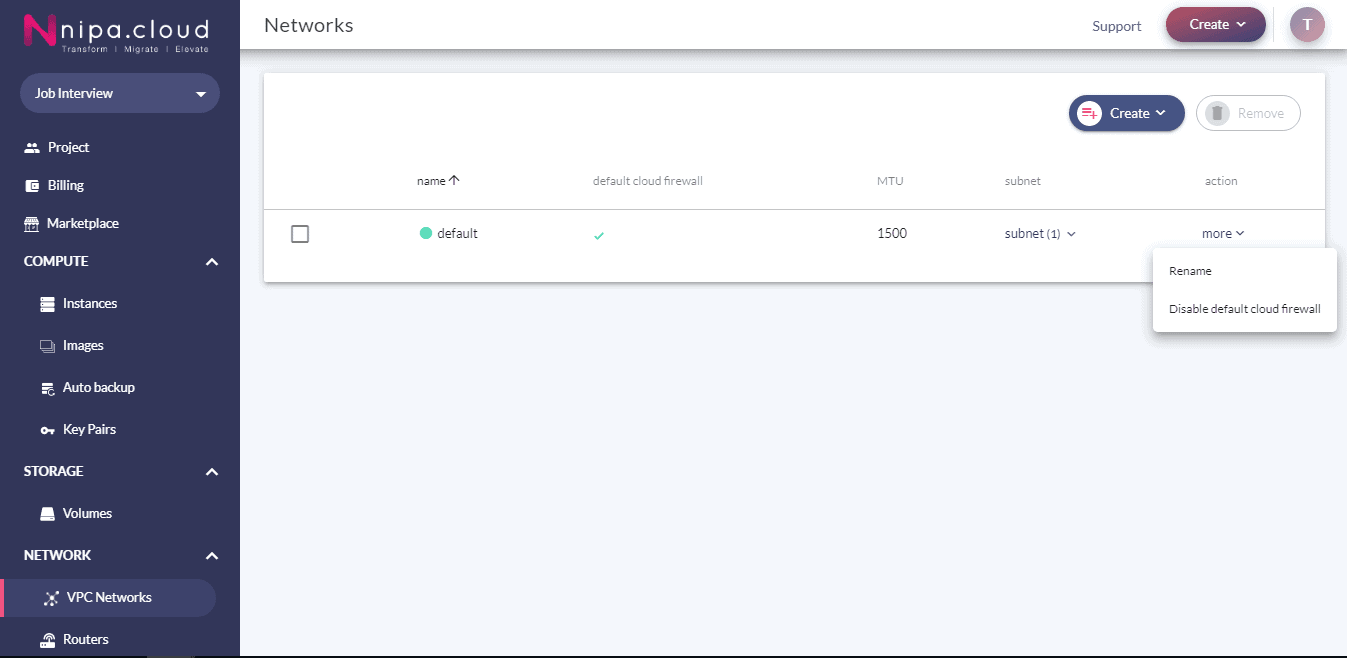
It is recommend to enable the Cloud Firewall on each instance. However, when you have to create multiple instance which Cloud Firewall is disabled, you can disable the Cloud Firewall by default for the subnet.
Please note that the disable default Cloud Firewall button is only affects to the new instance creation process. It will not disable Cloud Firewall on the existing instance.
To enable attaching the Cloud Firewall as default on the new instance creation process, you may use the Enable default Cloud Firewall button which correspond to the subnet.
You can manage each subnet in the VPC network menu. Open the subnet detail by click on the subnet(x) which correspond to the subnet you would like to manage. At the upper-right corner of each subnet modal box, Setting menu is located. Clicking on it will open the new modal windows for manage the subnet. There are four functional that you can manage in the subnet setting; e.g. DHCP enable/disable, DNS nameserver overriding, Allocation pool management, DHCP’s route announcement.
– DHCP enable/disable
You can enable or disable DHCP server from offer an ip address to the instance on subnet by using the toggle switch on upper-right corner of the subnet setting modal.
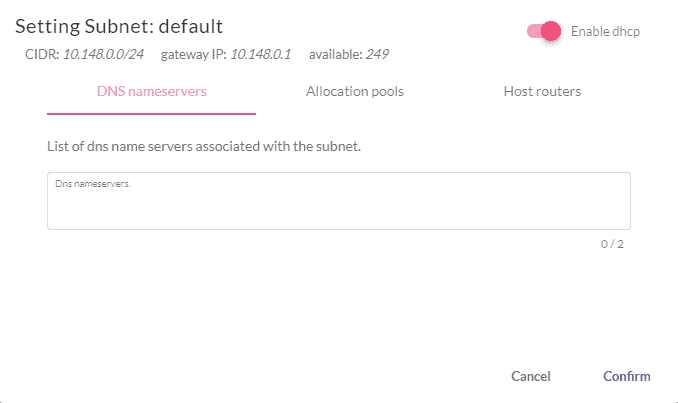
– DNS nameserver overriding
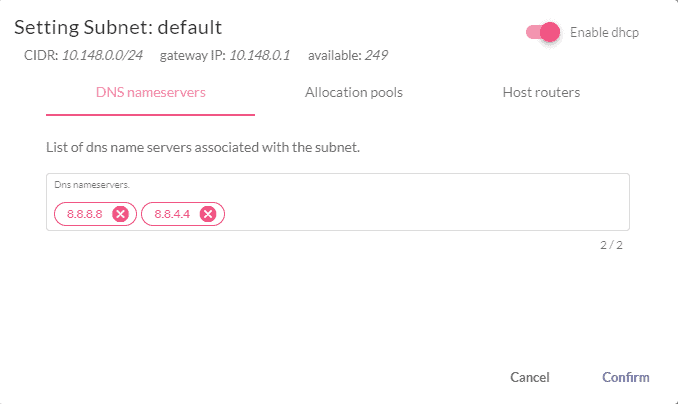
By default, VPC network provide two DHCP servers for each subnet. Putting the IP address in DNS nameservers textbox and confirm the changes will override the DNS nameserver for the subnet. DNS nameserver for the running instance will be change if you restart your network service.
– Allocation pool
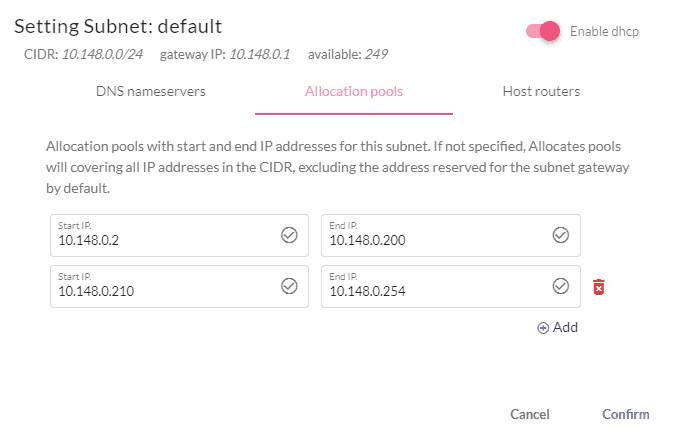
Allocation pool is an ip address range in the CIDR network block which allowed to be used by the cloud service. To exclude some ip address from the network subnet, you can reduce the pool size and add a new non-contiguous ip address range.
– DHCP’s route annoucement
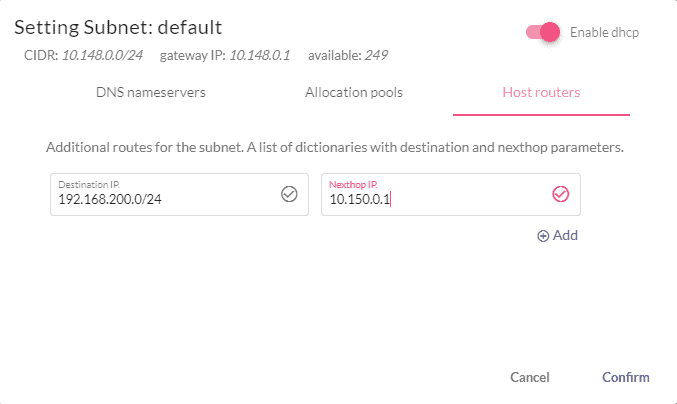
You can use DHCP feature to announce the static routing to the server. You may this feature if you have multiple interface on the instance and would like it to route traffic to the non-default gateway interface. To configure the route, open the subnet setting modal. Then, add the route and confirm.
Network management
You can create new subnet by using the create button on the VPC networks and click on the network dropdown menu button. Specify the proper network name and CIDR network block. By default, Cloud Firewall, DHCP, and Gateway on the subnet is enable. You can toggle the switch to disable them. If the Gateway to router is enable on the network, you have to pick the router to associate the newly create network to it.
You can remove the subnet from your project only when there is no instance using the subnet.

To change the Cloud Firewall name, just click on the more button, pick the rename dropdown menu button, and enter the new name before confirm.

It is recommend to enable the Cloud Firewall on each instance. However, when you have to create multiple instance which Cloud Firewall is disabled, you can disable the Cloud Firewall by default for the subnet.
Please note that the disable default Cloud Firewall button is only affects to the new instance creation process. It will not disable Cloud Firewall on the existing instance.
To enable attaching the Cloud Firewall as default on the new instance creation process, you may use the Enable default Cloud Firewall button which correspond to the subnet.
Subnet management
You can manage each subnet in the VPC network menu. Open the subnet detail by click on the subnet(x) which correspond to the subnet you would like to manage. At the upper-right corner of each subnet modal box, Setting menu is located. Clicking on it will open the new modal windows for manage the subnet. There are four functional that you can manage in the subnet setting; e.g. DHCP enable/disable, DNS nameserver overriding, Allocation pool management, DHCP’s route announcement.
– DHCP enable/disable
You can enable or disable DHCP server from offer an ip address to the instance on subnet by using the toggle switch on upper-right corner of the subnet setting modal.

– DNS nameserver overriding
By default, VPC network provide two DHCP servers for each subnet. Putting the IP address in DNS nameservers textbox and confirm the changes will override the DNS nameserver for the subnet. DNS nameserver for the running instance will be change if you restart your network service.

– Allocation pool
Allocation pool is an ip address range in the CIDR network block which allowed to be used by the cloud service. To exclude some ip address from the network subnet, you can reduce the pool size and add a new non-contiguous ip address range.

– DHCP’s route annoucement
You can use DHCP feature to announce the static routing to the server. You may this feature if you have multiple interface on the instance and would like it to route traffic to the non-default gateway interface. To configure the route, open the subnet setting modal. Then, add the route and confirm.

Create Instance on your new subnet
By default, instance will be create on the default subnet (10.148.0.0/16). You may create new subnet to be a private zone to increase the security on your project, but it will not automatically select the newly created subnet.
To launch new instance on your new private subnet, you have to select the subnet in the advanced menu while create the instance.
Pricing
Creating the network subnet is free of charge. However, create the router is not free. If you would like to create network subnet and mapping to the other router to isolate the network, you should check the router pricing. The internal data transfer between NCP service and instance are free.
For the external data transfer rate, please check on the data transfer pricing . Learn more >>
